
How to Find a Wall Stud
One of the most common types of DIY involves hanging decor on finished walls. While there are many types of hollow wall and drywall anchors available, when decorating involves mounting heavier items like shelves, televisions, larger frames and objects, it is always best to find a wall stud to secure it to. But if your walls are already finished, how do you go about finding a wall stud?
In this Article:
The Construction of a Wall
Different Ways to find a Wall Stud
– Measuring From Another Stud
– Nail/ Pilot Hole Method
– Magnet Method
– Using a Stud Finder
Planning Ahead
The Construction of a Wall
In order to understand how to find a stud, it is good to have a basic understanding of how a wall is constructed.
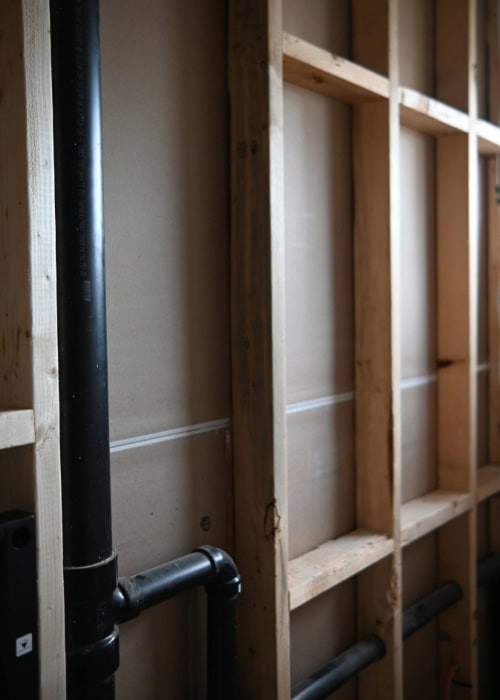
In North America, builders construct most walls using timber frame construction. They space vertical lumber 16″ apart and arrange it between horizontally running lumber at the top (a doubled ‘top plate’) and bottom (a ‘sole plate’). The framing creates a rigid skeleton that supports upper floors and the roof system, windows and doors, as well as supporting the drywall or lath and plaster.
One of the simplest and most secure ways to attach something to a wall is by driving a fastener (usually a screw) into the wall and into a stud. We usually place a stud every 16″. If we know where one is, we can measure across the wall in 16″ intervals to locate additional studs.
However, there are exceptions to this. In very old homes, builders might not have measured the stud spacing as specifically. In extremely energy-efficient homes, they might space studs out further to accommodate longer widths of insulation. The 16″ on-center spacing also changes in everyday construction because we do not build walls perfectly divisible by 16″. As a result, studs might be closer together near the end of a stretch of wall or near an opening for a door or window. Builders also add additional studs around windows and doors for structural support.
But not all homes use framing. Houses made from structural brick, concrete masonry units (concrete block), or poured concrete are structurally sufficient on their own and do not utilize framing unless it is added specifically to accommodate batt or spray foam insulation.
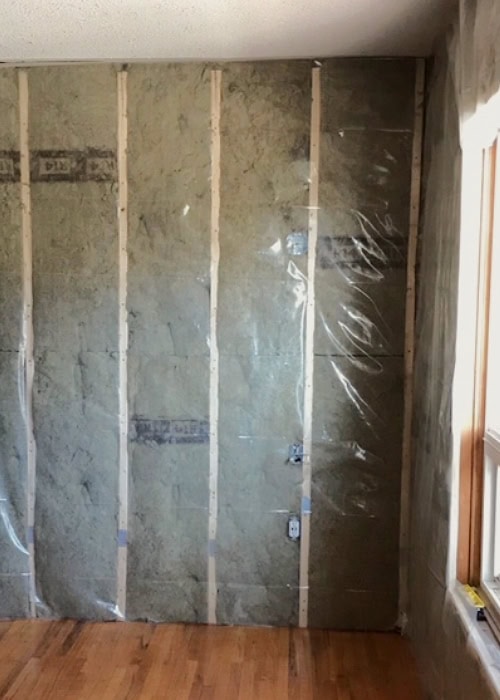
This is the case with my house, where builders constructed the foundation and exterior walls using structural brick. As we renovated room by room, I added 2×2″ framing to the inside of the exterior walls to accommodate a thin batt of insulation and a vapor barrier. This increased the home’s comfort without sacrificing too much square footage. I placed these batons at 16″ on center, just as we would space regular framing, to fit the width of a standard batt of insulation and provide a good base for hanging the new drywall. So, even though our house is constructed from brick, most walls now have framing behind the drywall.
But even if your home uses masonry (stone, concrete block, or brick), it is likely this material will be limited to the structural walls. In North America, it is very common to construct interior walls using 2×4″ framing. This is the case with my home, which has structural brick exterior walls and 2×4″ framed interior walls.
Different Ways to Find a Wall Stud
If you are hanging something that is more than 50lbs, the best course of action is to try to find a stud behind the drywall or plaster to help support the load of what the wall will be carrying. Of course, there is more than one way to find a wall stud, and I would recommend trying these methods, starting with the most straightforward.
Measuring From Another Stud
If you happen to know where one stud is, another one will not be far. As studs are most often spaced 16″ apart, measuring away from a known stud in 16″ intervals can help you to locate other stud locations. Once you have marked where you believe a stud to be, you can test this out by piercing the drywall with a thin nail, or drilling a small pilot hole to see if you hit a stud, or just an air gap behind the drywall.
You may know where your starting stud is because you previously opened up a part of a wall, or already have something else hanging on a stud nearby.
But if you don’t have an indication to start with, there are other clues that might help you locate that first stud which you can use to measure from. Firstly, the inner corner of a room should have two studs on either edge of the corner so that the drywall can attach to something. Windows and doors usually have a double stud on either side of them, with the outer stud (or king stud) extending to the top plate located at ceiling level. These known locations for studs can be used as a starting point to measure over from, which can then be tested by driving a thin nail into the wall, past the drywall to check.
Another clue you can use as a starting point is an outlet or switch box. Electrical boxes must be mounted to a stud on at least one side, so it is a safe bet that if you have an outlet on the wall you wish to hang something, there will be a stud on one side of that outlet, which can then be used as a starting point to measure you 16″ intervals from. Determining which side the outlet is on can be a bit of a guessing game, unless you are comfortable looking inside.
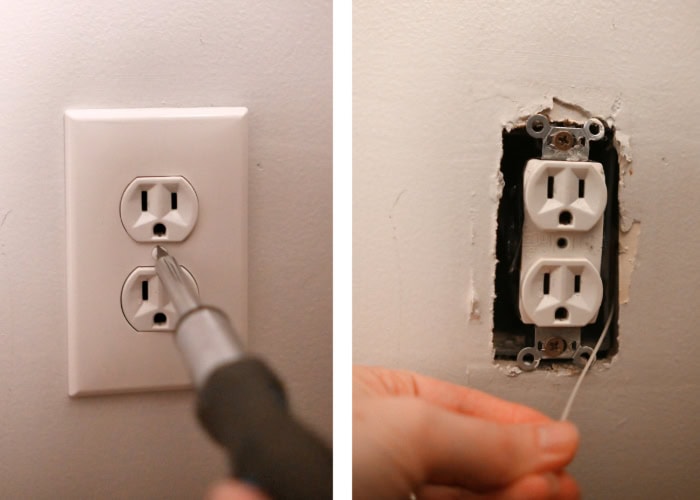
Start by taking off the cover plate by removing the screw(s) with a flat head screwdriver. Shine a light inside to look past the electrical box, to see if you can spot a stud to one side of the box. If you can’t see a stud, take a wire and stick it in the wall opening, making sure that you are inserting it to the outside of the electrical box, not within the box where there are live wires. Use the wire to feel for a stud. (*Note, it is always best to turn off the main power breaker before attempting something like this, and if you are unable to shut off power, use something plastic to conduct the test like a plastic knife or zip tie instead of a metal wire.)
Nail/ Pilot Hole Method
Even if you don’t have a good starting point to gauge from, a stud can be located by driving a thin nail through the drywall about 1″ to see what is behind it. You will be able to tell by the way the nail goes into the wall whether there is a stud there or not. Expect a bit of light resistance for the first 1/2″ as you are pushing or hammering the nail through drywall. If there is no stud behind the drywall, the nail will slip easily the rest of the way into the empty gap of a wall, or a wall filled with soft insulation, but if it encounters more resistance past the first 1/2″, and either stops or needs to be hammered harder, then then you have probably hit a stud.
This can also be accomplished by drilling a thin pilot hole with a small drill bit. A benefit of a drill bit is that it it will carry debris from the wall with it when you pull the drill out, so if you are unsure whether you have hit a stud just by the feel of it going into a wall, you can check that debris for bits of wood or sawdust from a potential stud.
If you try this technique with a nail or pilot hole and don’t hit a stud, move horizontally in one inch increments and try again until you do. Of course, this works best when you are confident that a horizontal line of up to 16 consecutive holes will be covered by whatever you will be hanging on the wall (ie, a horizonal shelf or large photo), so this method might not be your preference, unless you are comfortable with holes in or your wall or plan to fill them.
Magnet Method
This method is my favorite and should work if you know that you have plaster board or drywall on your walls (not lath and plaster). All you will need is a strong magnet. I have some rare earth magnets on the fridge and it worked really well with those.
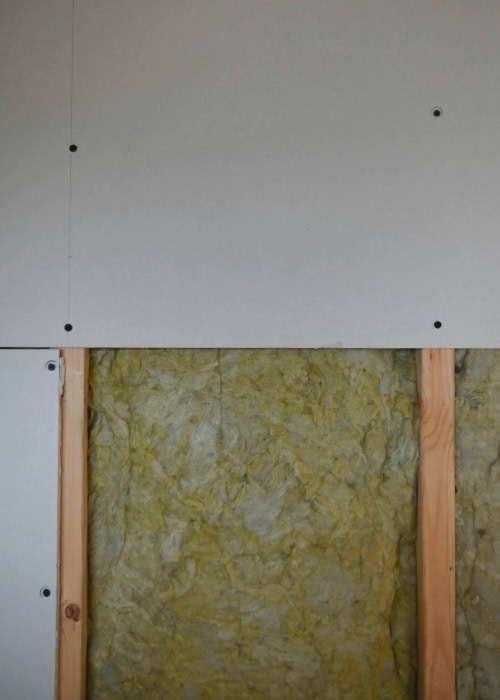
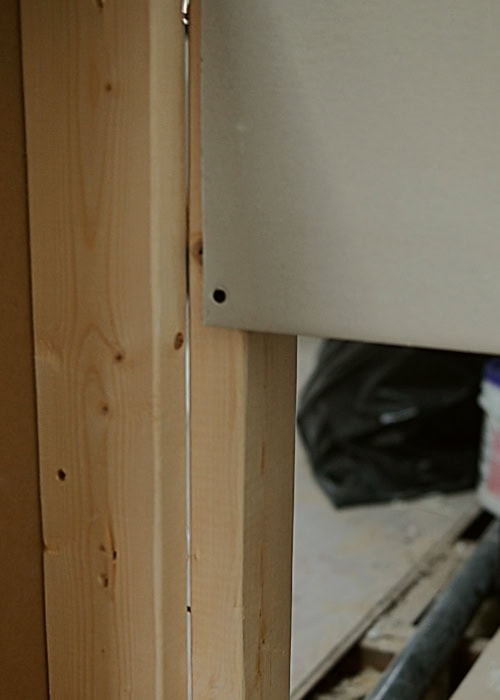
Drywall is hung by attaching to the underlying framing with steel screws spaced out in a grid about 8-16 inches apart. The screw has a flat head driven just below the surface, with a few skims of drywall compound on top.
A strong magnet will be stick to the screw heads, even if the screws have been plastered and painted over. Just run the magnet over the wall where you wish to find a stud, the magnet will eventually stick to a screwhead. Once you find one, you can run the magnet directly up and down from that spot to find more screws. If there are multiple screws in a vertical line, it confirms the presence of a stud.
Using a Stud Finder
A stud finder can also work, if you have access to one. A stud finder is an electronic device that measures the density of the wall behind it. Hold it flat against the wall, pointing upright and press the button at the side to set the gauge, capturing the current density of the wall behind the monitor. Then, when you move the device horizontally along the wall, it will beep or light up when it reads a density that is higher than the initial density set, ie, a stud.

Sometimes you have to hold this button down, or just press it once to set the initial density, just read the instructions to go with your device, usually they are pretty straightforward. One of the most common issues to have with a stud finder is that when you are pressing this button to set the initial density, your device might be located over a stud already, so the device cannot locate a higher density than the one already set. Therefore, it is a good idea to try setting the initial density from a few different places and to see if your results differ.
Because the stud finder indicates a change to a higher density, it is actually capturing the edge of a stud. Therefore, moving the stud finder from both directions towards a stud will allow you to mark its edges, ideally leaving you with two marks about 2″ apart which you can assume to be the width of the stud. I would recommend placing a long horizonal piece of painters’ tape along the wall and marking these edges on the tape, that way you can look for patterns ruling out other things that might be in the wall like plumbing lines and electrical cable. If these marks make sense, appearing every 16″, it is probably safe to assume you have located a few studs.
There are also apps available to download for a stud finders you can access on your phone, although the more accurate of these will also require the purchase of a sensor that is placed on the wall and connected to the app to visualize the internal wall components. So unless you plan to do a lot of work that requires this, you would probably get better value from a regular hardware store stud finder or one of the other methods listed above.
Planning Ahead
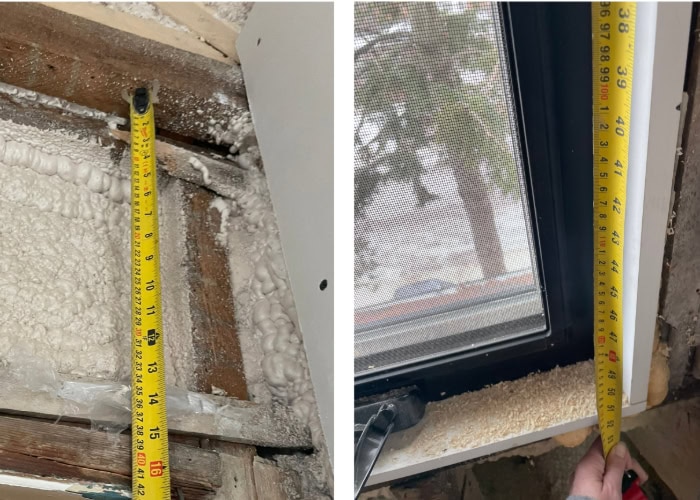
If you happen to have a wall open already, it is always good to take photos of the open wall and save the photo for future reference. This not only provides you with an indicator later of where studs are generally located, but it can remind you of what other things might be located in a wall that you do not wish to hit, such as plumbing and electrical.
It is especially helpful if you have a reference of distance in these photos, such as a tape measure running the length of a wall or from a corner or edge, with the numbers on the tape measure visible in the photo.
Alternatively, you could add a bit of painter’s tape or some sticky notes in your photos with notes and measurements for your future reference, such as “first stud 8″ from right wall” or “drain pipe 32″-36″ from floor”.
If you have the foresight to know where you want to hang certain decor while you have a wall open, and at what height, another extremely helpful thing to do while you have a wall already open is to add horizontal blocking in between the studs. This is just a piece of 2×4 or 2×6 that you can nail or screw in between the studs so that you can have something sturdy to screw into down the road, without having to worry about where the studs are.